Today we are going to be installing and configuring Radarr docker to work with NZBGet and Usenet. This is Episode 16 in our Raspberry Pi Series. If you have not followed our previous episodes we recommend you do so before attempting to follow any of our episodes. Each tutorial follows on from a custom setup and you may miss some prerequisites.
Having said that we will list out the prerequisites below. so you can attempt to complete today’s tutorial without watching our previous episodes.
Difficulty=Easy
Table of Contents
Copyright Disclaimer:
We do not condone piracy in any shape or form. We provide information for educational purposes. We are including Radarr in our Raspberry Pi series as it shows off how well the Raspberry Pi can integrate via API to other applications to automate tasks and organize data. Please respect the law regarding copyright in your country.
Prerequisites:
- A Raspberry Pi with Raspberry Pi OS installed. We recommend using an SSD for NZBGet.
- Secured Raspberry Pi.
- Openmediavault, Docker and Portainer Installed.
- A volume created in Openmediavault to be used for the Radarr container storage (Appdata folder).
- A Downloads folder stored on an external USB drive so you can store large media files.
- A Usenet provider – We recommend Newshosting You will need all your account details at hand.
- NZBGet Installed and configured to work with a Usenet provider. Check out our guide here.
Important! If you are running Raspberry Pi OS (Legacy) based on Buster you may need to apply the following in the terminal.
This will enable the backported version of libseccomp2 which will allow the Radarr container to work correctly.
sudo apt-key adv --keyserver keyserver.ubuntu.com --recv-keys 04EE7237B7D453EC 648ACFD622F3D138
echo "deb http://deb.debian.org/debian buster-backports main" | sudo tee -a /etc/apt/sources.list.d/buster-backports.list

sudo apt update

sudo apt install -t buster-backports libseccomp2
Recommended USB Hard Drives For Raspberry Pi:
| WD 1TB My Passport Portable External Hard Drive | WD 4 TB My Passport Portable External Hard Drive |
| USA Amazon Link: https://amzn.to/3qPl0Mo | USA Amazon Link: https://amzn.to/3qUCJSA |
| UK Amazon Link: https://amzn.to/33dz6ij | UK Amazon Link: https://amzn.to/3t1O7Pj |
What is Radarr?.
Radar is a movie collection indexer that can organize your movie collection and help you to find the correct file formats and file size for your existing movie collection. It can be used in conjunction with NZBGet which can allow access to download files from private Usenet servers.

Radarr also supports Torrent clients and services. We will not be going into Torrents in today’s episode.
How to install Radarr Docker on a Raspberry Pi 4.
Step 1 – Create the folders needed for the Radarr Docker container.
You will need to connect via a SSH terminal to create the folders needed to use Radarr.
Open up Putty or a terminal application and establish an SSH connection to your Raspberry Pi.
ssh -p PORT USERNAME@YOURRASPBERRYPIIP
The first thing to do is to create the “radar” “config” folder for docker to save persistent data to.
Navigate to your Appdata folder or the location you store all your container data.
cd /srv/YOURUSBDISKUUID/Appdata
To create the “radarr” folder.
mkdir radarr
Now navigate into the “radarr” folder.
cd radarr
To create the “config” folder.
mkdir config
Now navigate into the “config” folder.
cd config
You will now need to get the Absolute path so it can be added to your Radarr stack file later on. Use the following command to get the file path.
pwd
Copy and paste the output file path to a text file so it can be used later.
You will also need a “downloads” folder. If you have not created this already by following our previous episodes you can create this file anywhere on your external USB drive by following the same as above. Be sure to also get the Absolute path for your downloads folder and paste that into a text document to use later on.
Finally, you will also need a “movies” folder. Again create this movies folder on your external USB drive. You can use a separate drive if you please as depending on your movie formats and file sizes movies can become very large so you will need plenty of storage space.
Optionally if you like to divide content for parental control for example a “kidsmovies” folder for child-friendly content.
So follow the same as above (creating the config folder) to create both these folders in an appropriate place. In our example, I have created both the “movies” and “kidsmovies” folders inside the “downloads” folder.
These two folders are the final destination for all downloaded movies once Radarr has processed the data. These folders are what you would add to Plex for example.
The downloads folder is only used for processing the data. Once the data has been processed it will move the movie to the movies folder.
Step 2 – Create the Radarr container using Portainer and a Stack.
Navigate to your Portainer dashboard and log in.

From the left hand menu click on “Stacks“.

Now in the Stacks dashboard click on “Add a stack“.
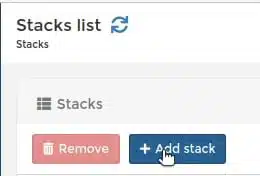
In the “Name” field enter “radarr“
Now Copy and paste the following docker-compose data into the “Web editor” field. Be sure to change all the file paths to the absolute paths you saved to a text file in the previous step.
You will also need to change the “TZ“, “PUID” and “PGID” fields to match your setup. You can find these by following our video guide above.
Radarr Docker Compose Stack
---
version: "2.1"
services:
  radarr:
    image: ghcr.io/linuxserver/radarr
    container_name: radarr
    environment:
      - PUID=1001
      - PGID=100
      - TZ=Europe/London
    volumes:
      - /PATH/TO/FOLDER/Appdata/radarr/config:/config
      - /PATH/TO/FOLDER/Downloads/media/movies:/movies
      - /PATH/TO/FOLDER/Downloads/media/kidsmovies:/kidsmovies #optional
      - /PATH/TO/FOLDER/Downloads:/downloads
    ports:
      - 7878:7878
    restart: unless-stopped
Once you have completed that you are ready to click “Deploy the stack“.

If you navigate to “Containers” in the left menu

You should now see your “radarr” container in the list.

Give the container a few minutes to fully start up then you can connect to the Radarr dashboard.
http://YOURRASPBERRYPIIP:7878

You should now be ready to configure Radarr.
If you would like to know how to configure Radarr to work with NZBGet. Please watch our Youtube video at the top of this blog post.
Having installation problems?.
If Radar installed fine but you can’t access the dashboard please apply this fix. https://docs.linuxserver.io/faq
This concludes today’s tutorial.
We need your support.
We hope you enjoyed this episode and that it was helpful and you got benefit out of it.
If you did, please consider supporting our channel by Subscribing to our YouTube channel, and liking and sharing our content.
You can also make a donation via Paypal or become a Patreon if you wish to do so.
You can also follow us on Facebook or Twitter.
If you have any questions or any requests please ask in the comments below or on YouTube.


I just finished up this video late tonight. I have been following along with your series, enjoying it and learning a lot from it. I have ran into a few issues here and there, most recently with nginx proxy manager which I did finally figure out. As far as radarr goes, everything went good and on portainer, it showed what appeared to be a healthy running container. When I tried to go to the web ui however, there was no page to navigate to. I keep htop running next to me and I happened to notice that for radarr, it was saying something about ‘s6-supervise radarr’ and I knew that that wasn’t normal. In the logs, everything looking ok, no permission errors or anything but there was a line saying, “Your DockerHost is most likely running an outdated version of libseccomp.” I looked into it and it all related to the same issue which was the cause of the web UI not working. The fix: run two commands
wget http://ftp.us.debian.org/debian/pool/main/libs/libseccomp/libseccomp2_2.4.41~bpo10+1_armhf.deb
sudo dpkg -i libseccomp2_2.4.4-1~bpo10+1_armhf.deb
Just wanted to share that. Appreciate the content
Thank you for your feedback. This issue has reared its head on a few containers mostly from linuxserver.io. This is why I used an alternative for the NZBGet tutorial. It seems to be an issue more so with Raspberry Pi OS and the libseccomp package than the container itself.
I wonder if anyone else has had the same issue. I will do some more testing.
More on the issue here: https://docs.linuxserver.io/faq
Another fantastic job mate! Unfortunatelly I stumbled to the below mistake and cant manage to fix it 🙁 Reinstalled the container several times following everything but ending with the same mistake over and over again. Thanks!
You are using docker; download client NZBGET places downloads in /srv/dev-disk-by-uuid-efacdca8-176a-471a-ac8c-271742fd4c40/Downloads/completed/Movies but this directory does not appear to exist inside the container. Review your remote path mappings and container volume settings.
Hey Petar did you find a solution to this issue? I’m having the same problem.
i have problem – You are using docker; download client NZBGET places downloads in /config/downloads/completed/Movies but this directory does not appear to exist inside the container. Review your remote path mappings and container volume settings
If you get “You are using docker; download client NZBGET places downloads in /config/downloads/completed/Movies”
Make sure your downloads directory and your media directory are separated. So on your system raspberry pi’s file system:
/downloads
/media
and not /downloads/media.
Amazing tutos, thanks so much.
A question : I have a SSD and a big HDD drive.
Should we configure the “config” path parameter to be on the SSD instead of the HDD and let him spindown when unused somehow?
Thanks a lot