Today we are going to be installing Pihole Docker on a Raspberry Pi 4. Pi-hole is an open-source free to use network-wide DNS and AdBlock server. It can be installed on your Raspberry Pi and managed through a dedicated dashboard.
Difficulty = Advanced
Table of Contents
How Pi-hole Works

Pi-hole works by sending DNS traffic through your Pi-hole server. Pi-hole has built in blacklists (You can also add more lists manually) which will block any domain requests from any domain’s listed on the blacklists.
Out the box Pi-hole blocks nearly 70,000 domains.
Why use Pi-hole?
Instead of having to manage every device on your network independently, Pi-hole can be used to set network-wide rules for every device in your network from a centralized place.
It can also speed up your DNS response time across the whole network work as it caches DNS requests locally. This means each device does that uses popular URLs will not have to send repeated requests to your upstream DNS servers reducing the time it takes to resolve the domain name to an IP.
The other areas that Pi-hole can help is as follows:
Ad blocking:
If you use a mobile device you will know how annoying ad pop-ups and in-game apps can be. Mobile phones also generally have to be rooted in order to add efficient device ad-blocks voiding manufacture warranties and risking possible bricks flashing custom bootloaders and firmwares.
Smart devices including TV’s that offer third party catch up services also serve up adverts which can be annoying and distracting. To add further complication some TV’s also run custom Operating System firmware that can make it difficult to sideload or even impossible to add in-device Ad-blocking apps and blocklists.
Parental Controls:
Not only can Pi-hole block adverts and serve custom DNS requests it can also block websites that are inappropriate for children. There are huge blacklists that can be added to Pi-hole with a click of a button. Or you can block a single website by adding it to the blacklist manually.
Security:
DNS queries by default are not secure. The requests travel through the internet in plain text which can be seen by any third party that is monitoring your traffic like an Internet Service Provider (ISP) or a VPN provider.
Pi-hole can be set up to encrypt DNS traffic using the HTTPS protocol. This is called DNS-over-HTTPS. Basically, instead of sending out DNS requests over port 55 which is non-encrypted it instead sends DNS traffic over the HTTPS protocol using port 443. Thus encrypting the DNS requests from any man in the middle monitoring. There is also DNSSEC however using DoH gives better privacy and helps to circumvent censorship.
This is out of the scope of today’s tutorial and we may cover it in a future post.
Purchase a Raspberry Pi 4
| Amazon USA | Amazon UK |
Before you start
Know what you are getting yourself into. DNS configuration is an advanced topic. So a good basic understanding of how DNS works is needed.
You could also benefit from using Pi-hole on a dedicated Raspberry Pi. This all depends on how many devices you would like to serve DNS to.
Running Pi-hole can be resource hungry. But in most cases, a Raspberry Pi should have no problems serving a small office or home network.
Pros & Cons of running a network-wide Pi-hole server.
Pros
- Blocks Adverts Across The Network
- Parental Controls – Site blacklisting
- Extra Security using DNS-over-HTTPS
- Network DNS monitoring
- Traffic Logging
- Better Privacy
- Centralized Network DNS Control
Cons
- Can break some On-Demand Streaming Services
- Can break some websites
- Not effective at blocking ads on YouTube
- May need manual tweaking at times
Prerequisites:
- A Raspberry Pi with Raspberry Pi OS installed. We recommend using an SSD for Qbittorent hosting.
- Secured Raspberry Pi.
- Openmediavault, Docker and Portainer Installed.
- A volume created in Openmediavault to be used for Pi-hole container data (Appdata folder).
- You will need to know your network routers gateway IP address.
Installing Pihole Docker on a Raspberry Pi 4
Now you know all about Pi-hole and what it can do for you. Lets install it onto a docker and set up a device to work with it.
Step 1 – Create the Pi-hole Appdata and dnsmasq folder
The first thing to do is to create the Appdata folder to store the Pi-hole data files in.
Open up a terminal window and SSH into your Raspberry Pi.
ssh -p PORT USER@YOURPIIPADDRESS
Once you have established an SSH connection navigate to your “Appdata” folder (if you have not created an Appdata folder previously then you will need to create this first).
cd /srv/DRIVENAME/Appdata/
Now create the “pihole” data folder.
mkdir pihole
Now navigate into the “pihole” folder.
cd pihole
Now we need to get the “absolute path” of the pihole data folder so we can use this in step three.
pwd
Once you run the “pwd” command you can now copy into memory the output should look similar to this.
/srv/dev-disk-by-uuid-66a2bf8a-bed9-420a-b77d-ba48bcf3f836/Appdata/pihole
Take note of this path in a text file.
We now have to do the same again to create the dnsmasq folder.
Navigate to the “pihole” Appdata folder.
cd /srv/dev-disk-by-uuid-66a2bf8a-bed9-420a-b77d-ba48bcf3f836/Appdata/pihole
Now create the “dnsmasq” folder.
mkdir dnsmasq
Navigate into this folder.
cd dnsmasq
Now we need to get the “absolute path” of the dnsmasq data folder so we can use this in step three.
pwd
Once you run the “pwd” command, like we did with the pihole absolute path. Take note of this path in the same text file. We will need this in Step 3
Step 2 – Edit the network settings in Openmediavault
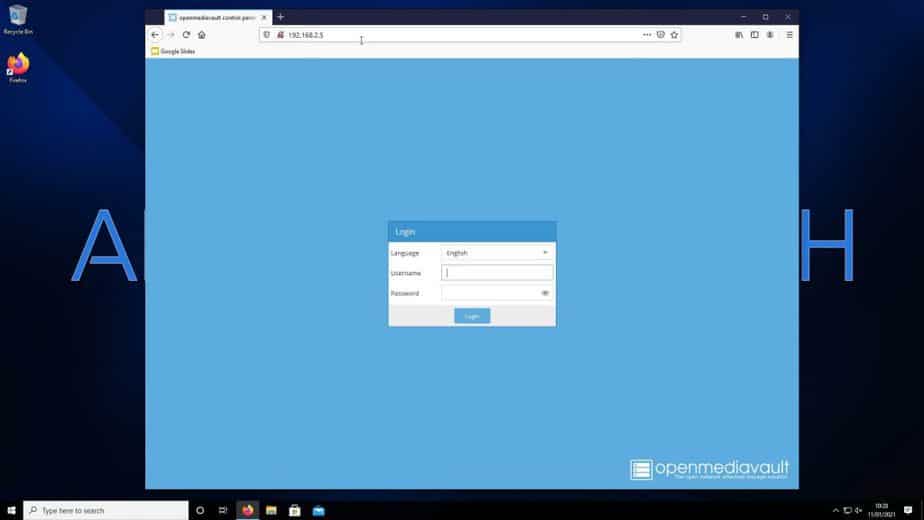
Log into your “Openmediavault” dashboard.
Click on the “Network” tab in the left menu.

You should have one Network interface configured which should by default be “eth0“. Click on “eth0” which will highlight the whole network entry. Now click on “edit” in the menu above.

Scroll down to “Advanced settings” and under “DNS servers” enter “1.1.1.1” For Cloudflare’s DNS service. Then click “Save”.

Step 3 – Create A Pi-hole Network Using The SSH Terminal
If you are using Windows you can use Putty to connect via SSH to your Raspberry Pi.
If you are using Linux you can use the built in Terminal Application.
Open a terminal window.
Connect to your Raspberry Pi using SSH
ssh -p 1984 [email protected]
Once you have connected you will need to run the following docker command to create the pihole network interface for Pi-hole.
Replace the “subnet” with your with your Raspberry Pi’s local IP address followed by the “/24“
Example: 192.168.2.5/24
Change the “gateway” to match your routers IP address. In my example it is “192.168.2.1“
Note: Make sure you are using the correct CIDR notation for your IP address range.
docker network create -d macvlan \
    --subnet=192.168.2.5/24 \
    --gateway=192.168.2.1 \
    -o parent=eth0 pihole_net
“Copy and paste” command into your terminal window and press “enter” to execute. It should return a long string of characters which will confirm the network interface was created.

Step 4 – Create the Pi-hole Container in Portainer
Open up a browser window and navigate to you Portainer Dashboard and log in.

Once logged in click on “Containers” in the left menu.

Now click on “Add container“.

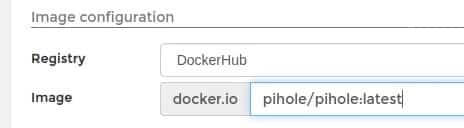
Give the new container a name. In our example we have called our container “pihole“.

Under “Image” type in “pihole/pihole:latest“.
Under “Network ports configuration” click on “Publish all exposed network ports to random host ports” button. To enable it.

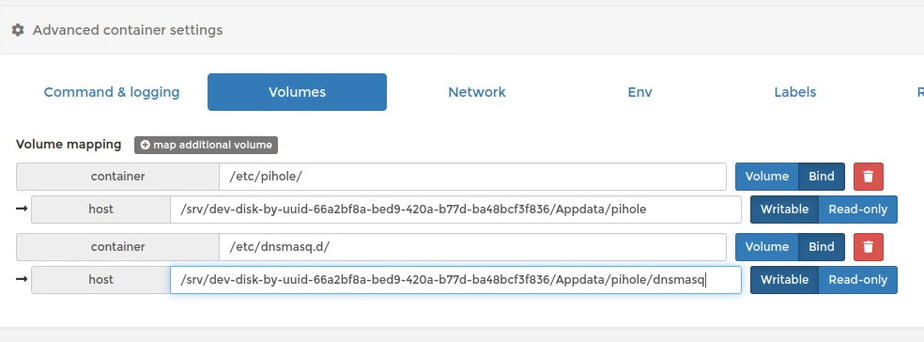
Under “Advanced container settings” click on the “Volumes” tab.

Next to “Volume mapping” there is a button that says “+ map additional volume” Click that button twice to give us two new container – host fields.

In the first “container” field add “/etc/pihole/” and click the “Bind” button at the end.
Now in the “host” field put in your “pihole absolute path” for you pihole folder that we pasted into a text file in Step 1.
In the second “container field” add “/etc/dnsmasq.d/” and click “Bind button at the end.
Now under “host” field add the “dnsmasq absolute path” that we pasted into a text file in Step 1.
It should look similar to this.
Now back under “Advanced container settings” click on the “Network” tab.

Under “Network” select our “pihole_net” from the drop-down list.
Under “Hostname” enter “pihole“.
Under “IPv4 Address” enter an IP address you would like to use with the interface. This has to be a unique IP and not the same as your current Raspberry Pi. Make sure the IP used is still in the same subnet mask range as your gateway router.
In our example we will use “192.168.2.111“.
Your Network tab settings should look similar to ours.

Under “Advanced container settings” now click on the “Env” tab.
Next to “Environment variables” click on “+ add environment variable” button 3 times to add 3 new name – value fields.

Each name – value field on the same line needs to have the following.
In the first “name” field type “TZ” and in the “value” field on the same line type in your timezone. In our example we are in the UK so we will use “Europe/London“.
In the next name-value field on the same line we will add the following.
In the name field type “ServerIP” and in the “value” field type “192.168.2.111“.
In the final name-value field we will add the following.
In the “name” field add “WEBPASSWORD” all in capitals and add a unique secure password to the “value” field. We will use “password” for demonstration purposes.
Your Env tab settings should look similar to our.

Under “Advanced container settings” now click on the “Restart policy” tab.
Select the “Unless stopped” button.

Finally Under “Advanced container settings” now click on the “Capabilities” tab and turn “on” the “NET_ADMIN” switch.

Now everything is set up you can click on “Deploy the container” to create the Pi-hole container.
Note: This may take some time.
Once the deployment has finished you should see your new “pihole” container in the “Containers” list.
Wait for the “State” to turn to “healthy” before proceeding to the next step,
Step 5 – Accessing Your Pi-hole Server
You can now navigate to the IP address you set in the container settings. In our example we used “192.168.2.111”.
Navigate to a browser and in the address bar type in you “IP address” followed by “/admin“.
IPADDRESS/admin
Example: 192.168.2.111/admin
You should now see the Pi-hole Dashboard.

You can now click the “Login” button in the left hand menu to login.

Use the password you added in the containers “Env” and click “Log in“.

Step 6 – Configuring Your Router so that all devices use Pi-hole.
You may want all your devices to use Pi-hole for DNS and adblock features. You can do this by setting your main network gateway router’s DNS address to your local Pi-hole servers.
As every router is different and I could in no way cover them all. You will need to “Google” how to do this using your model name for example “Asus Router change DNS address“. There will be a guide on how to do this for your particular router model.
Once you change this DNS address to your Pi-hole server ALL DNS traffic will now travel through your Raspberry Pi.
You will need to monitor your devices over the next few weeks to make sure that everything is working correctly. Also that the load of all your network devices isn’t to much for your Raspberry Pi to take. If it is consider using a dedicated Raspberry Pi 4 for your whole network.
Best Router Of 2022 – Buy Now From Amazon
| Amazon USA | Amazon UK |
Use Pi-hole on a Single Device:
If you only want to use Pi-hole DNS on a single device then you can set the DNS server IP manually on that specific device to use your Pi-hole server’s IP address. This will then route all the DNS traffic for that device through Pi-hole.
Again you will need to use Google to learn how to do this on your specific device. As this is outside of today’s episode scope.
If you have any questions please let us know below in the comments or in the comment section on our YouTube channel.
This concludes today’s tutorial.
We need your support.
We hope you enjoyed this episode and that it was helpful and you got benefit out of it.
If you did, please consider supporting our channel by Subscribing to our YouTube channel, and liking and sharing our content.
You can also make a donation via Paypal or become a Patreon if you wish to do so.
You can also follow us on Facebook or Twitter.
If you have any questions or any requests please ask in the comments below or on YouTube.


Very clean and easy to follow instructions, and everything worked as described. Thanks
Awesome! Worked very good info. And I was able to export / import all 724,517 domain block sites using pihole Teleporter. And my DCHP 56 fixed reservations came over. Now I simply need to change my DNS IP in my router and I will be in business.
Some ideas for tutorials. WireGuard with Portainer. VPN on all docer images or different vpn for each one. That is the question.
Thanks,
Chris from CA.
This is exactly what I was looking for. Everything works great, except the password doesn’t work to log into the dashboard, and no matter what I do, I can’t get it to accept what I put in there. Other than that, it’s golden!
Great. working perfectly
and here some of the Adlist links you can add it https://firebog.net
from group management select Adlist , add the links , click on Tools Update gravity list
I get 5113761 domains blocked
Thanks 🙂
video to work with wireguard would be nice